A couple methods for installing Python
All tutorials on this website can be completed using Google Colab, but for those who want to install Python on their own (local) machine, here are a couple different ways of installing it.
A typical installation for Python involves two things:
- Downloading Python
- Downloading ~something to write Python documents (scripts) in~
The most common way of installing Python is through python.org, though there are other distributions such as Anaconda. Either of these would be sufficient, but I’ve grown fond of what I’m going to call “the easy way”, which uses Positron and enforces more of a project-based system for Python environments. The two different installation guides below walk you through installing Python step-by-step.
Linux users, I presume you know what you’re doing 🤠 but you should also be able to follow the instructions here, if needed.
Work with Positron
Positron is a relatively new IDE (aka “integrated development environment”) that essentially combines some of the best of RStudio and VSCode (two alternatives) into one interface. In general, IDEs typically have some extra features that help with writing code – that’s sorta what makes them special. Positron can function just as a text editor, but it also has that additional functionality that can be nice.
Positron intends to provide features that make it ideal for working with data and it has built-in support for generating virtual environments for your projects. A virtual environment is like a sandbox - within the boundaries of the sandbox, we can install anything we need to use to write Python code for our project, but it doesn’t affect the rest of our installation (unlike any actual sandbox, the sand doesn’t escape). Critically: it just makes it easier to navigate dependencies for different projects, but if that’s gibberish to you, don’t worry about that for now.
Install Positron
First, download the Positron installer that is applicable for your device. When you click on the Download button, you will be asked to Agree to their Terms and Conditions: 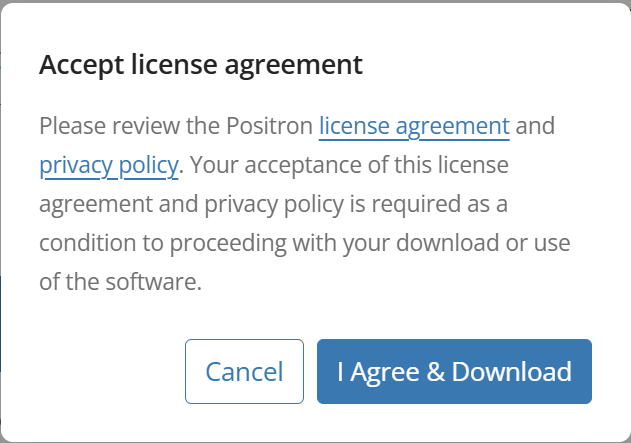
Once you agree, the download will begin.
The Positron installer will appear in your Downloads folder. In Finder  for Mac or
 File Explorer  for Windows, navigate to your
 Downloads folder in the left sidebar. When you click on the installer, the steps for installation will vary slightly depending on your operating system
Mac
When you click on the installer, it will open a window where you will drag and drop Positron into your Applications folder: 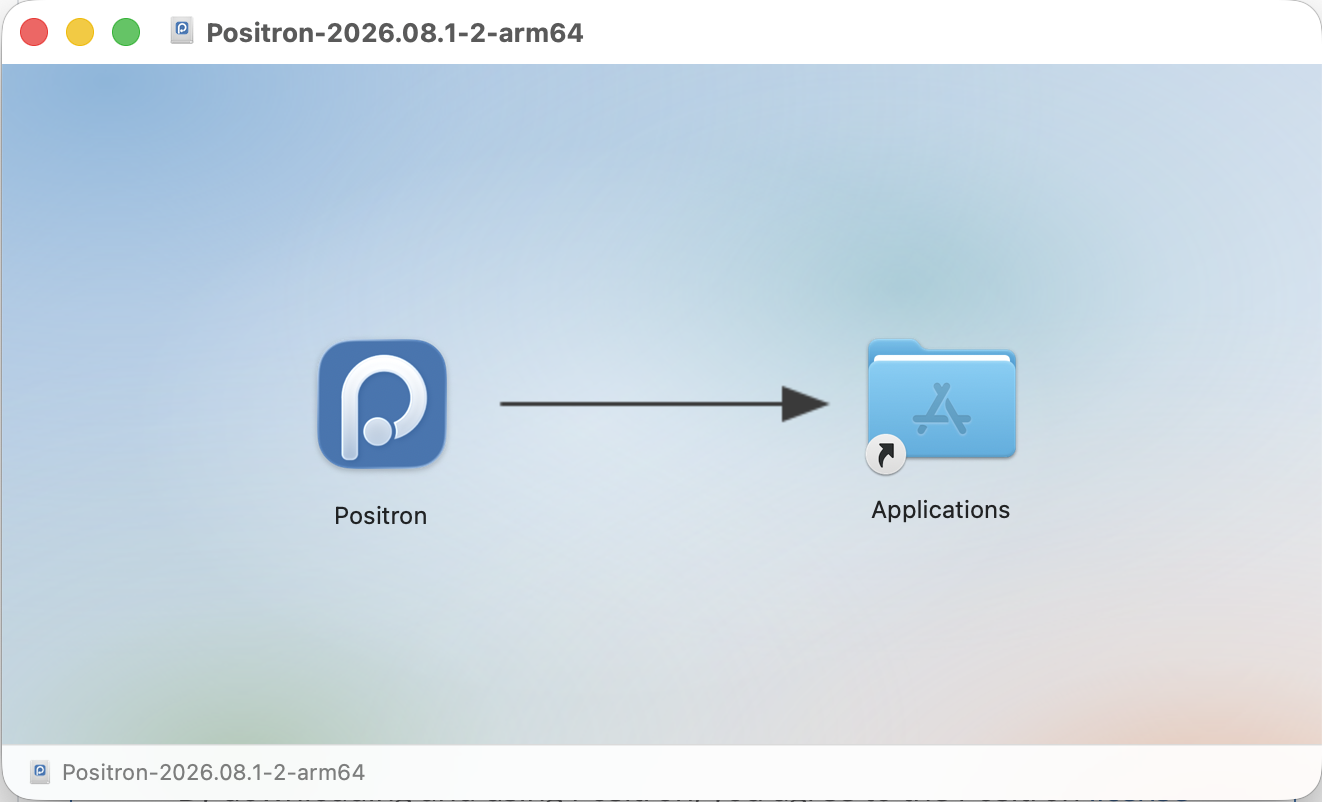
And you’re done!
Windows
First, the installer will (perhaps, again) ask you to agree to the License Agreement. Accept and click Next: 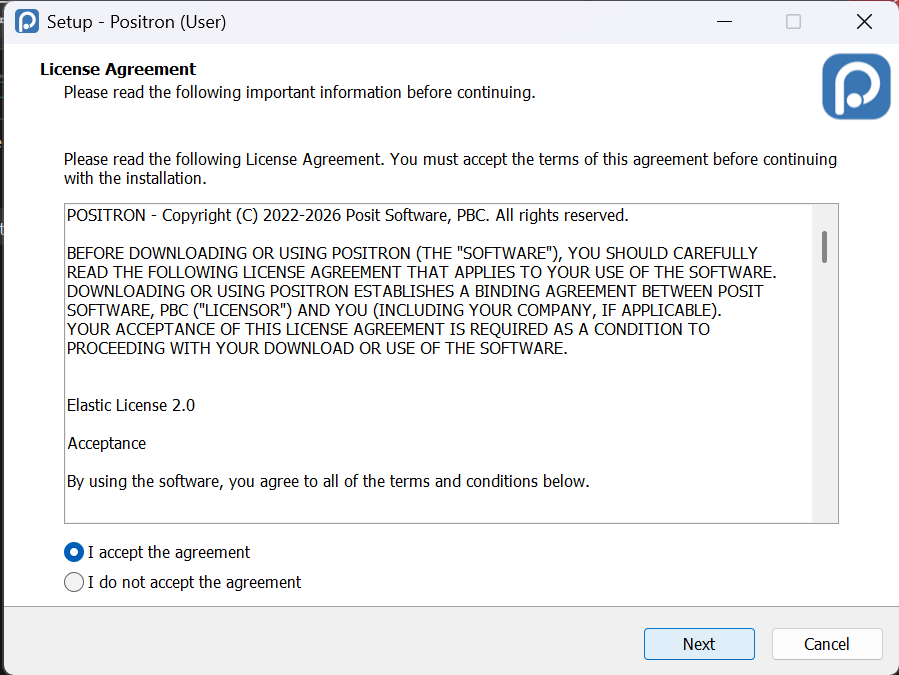
Then, you’ll be asked to
- select the destination folder where it should be installed,
- select the start menu folder,
- and delect additional tasks.
For each of these installer pages, you should accept the defaults Positron suggests by clicking Next.
Finally, confirm you want to start the installation by clicking Install: 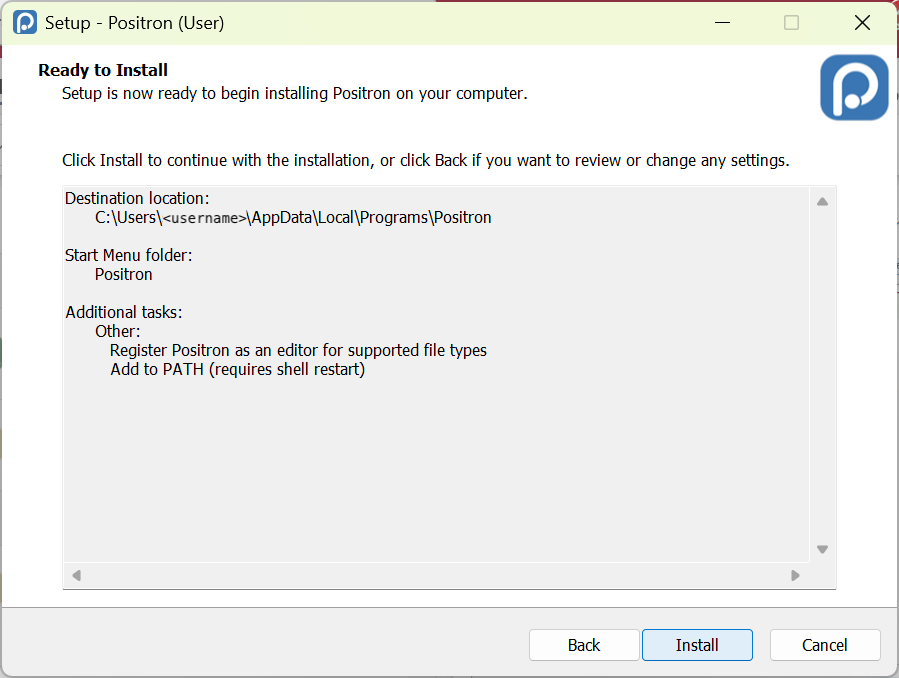
It will produce a progress bar that shows it installing. At the end of the installation process, you’ll click Finish to close the installer.
And you’re done!
Create a python Session for a given project
Create a “Project” (or, a folder for your work) by selecting the New Folder... option on the Welcome page or by selecting New Folder from Template... from the + New button in the top left corner of the IDE. You’ll select Python Project from the template and then click Next: 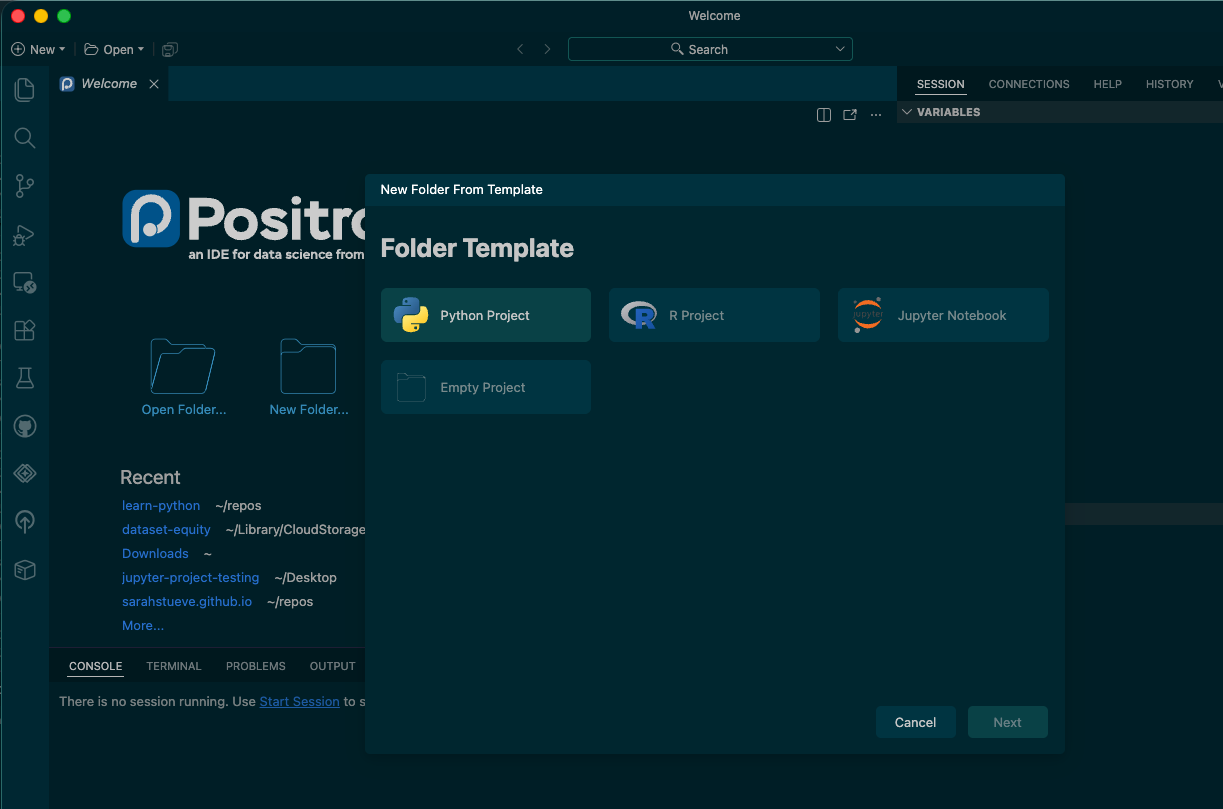
You’ll be asked to select a location for the project. You can click Browse... to choose a different location than the one provided (i.e., if you want the folder in your Documents folder). You will also provide the name of the folder you want to create! 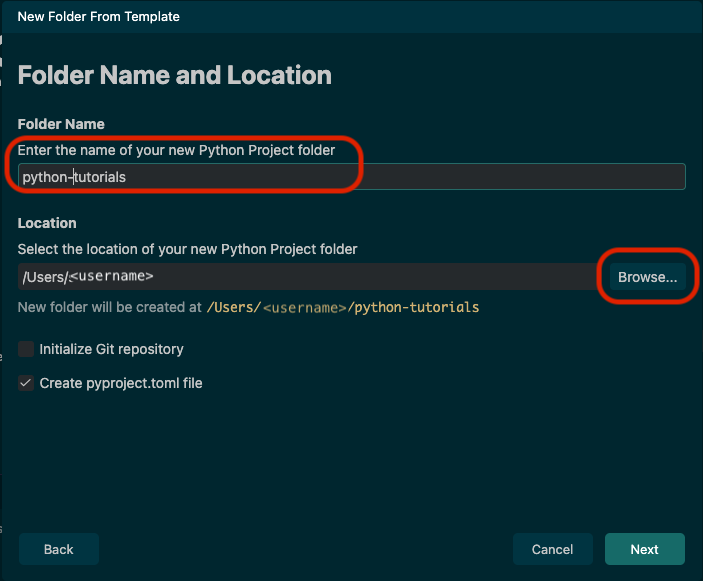
Then, you’ll be asked if you want to create a Python environment with uv. You should leave the defaults as they are and click Create: 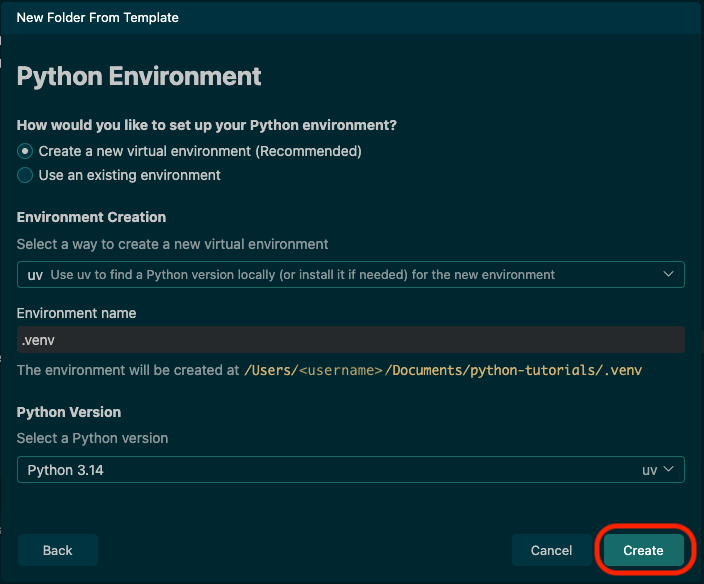
Once you create the environment, this is the first page you will see when you open the new folder. To make sure our Python environment is setup correctly, we need to install the required packages for the tutorial. To do this, first click on the TERMINAL tab in the middle-bottom section of Positron: 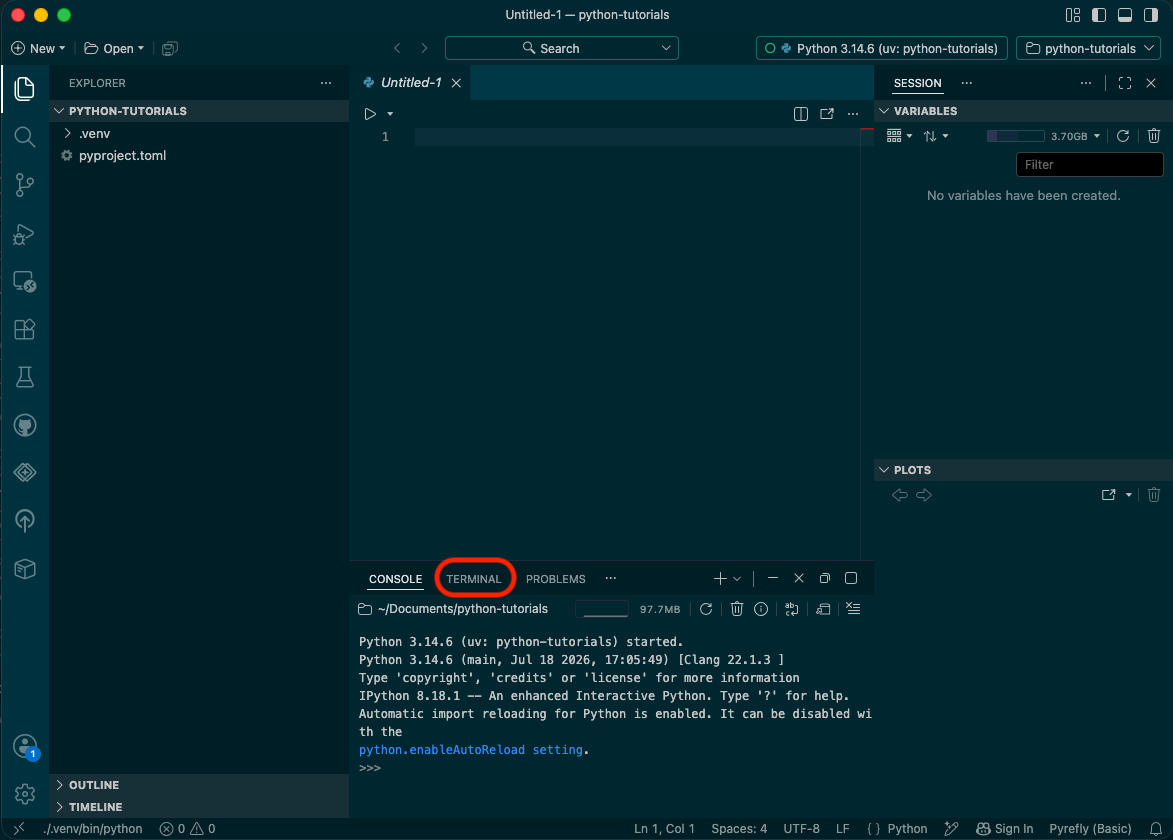
Once the Terminal is open, we’ll run a command to install packages using uv add. The syntax looks like this: uv add package1 package2 package3 .... The first tutorial on this website relies on the following packages, so let’s start with installing those! Run the below command in Terminal like so:
uv add pandas plotnine matplotlib seaborn jupyter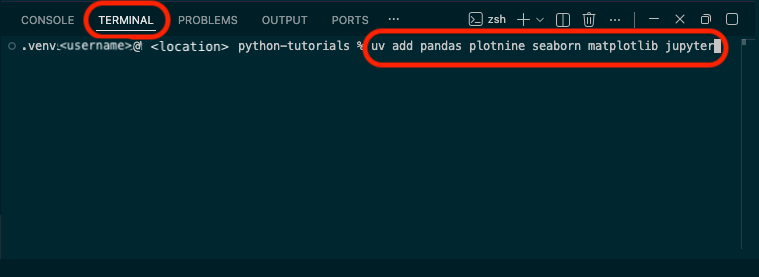
Once the packages are installed, you’re ready to create your first Jupyter Notebook (it’s an interactive document that allows us to both write code and take notes!). In the left side bar, click on the New File... icon  and then type in the name of the file you want to create. Whatever it is, it has to include the file extension (think .docx, or .xlsx)
 .ipynb for “iPython Notebook”: 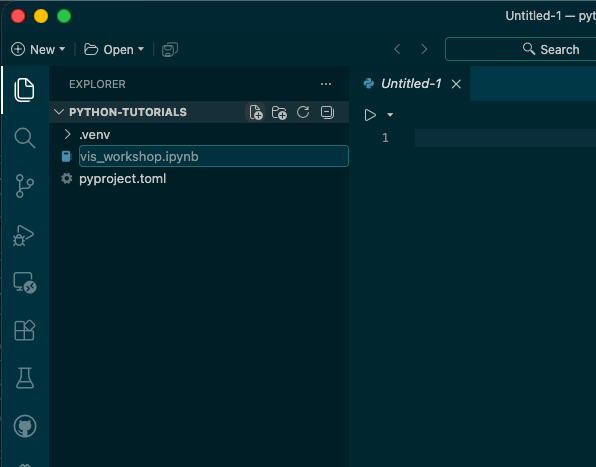
To start writing code, the last step you’ll take is clicking on the +Code button at the top right of the new document to make a code block. 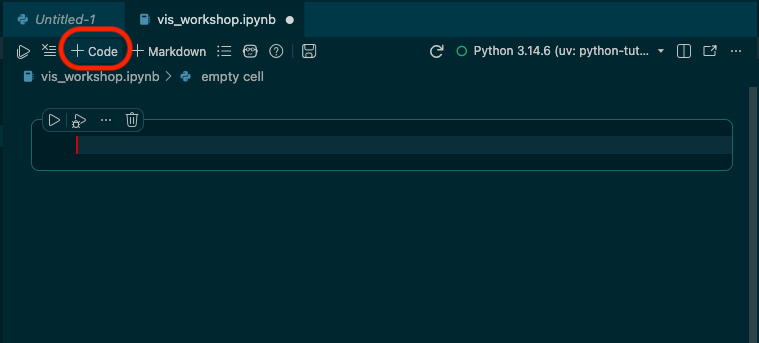
You’re ready!
Install Python from python.org
While the instructions below are for the Mac installer, the Windows installation will be similar. Basically: allow the installer to choose the defaults and “Continue” and “Agree”.
First, select the installer that’s appropriate for your device. Hover over the Downloads tab and then select the appropriate installer (if you have a Windows computer, choose the Windows installer, etc.): 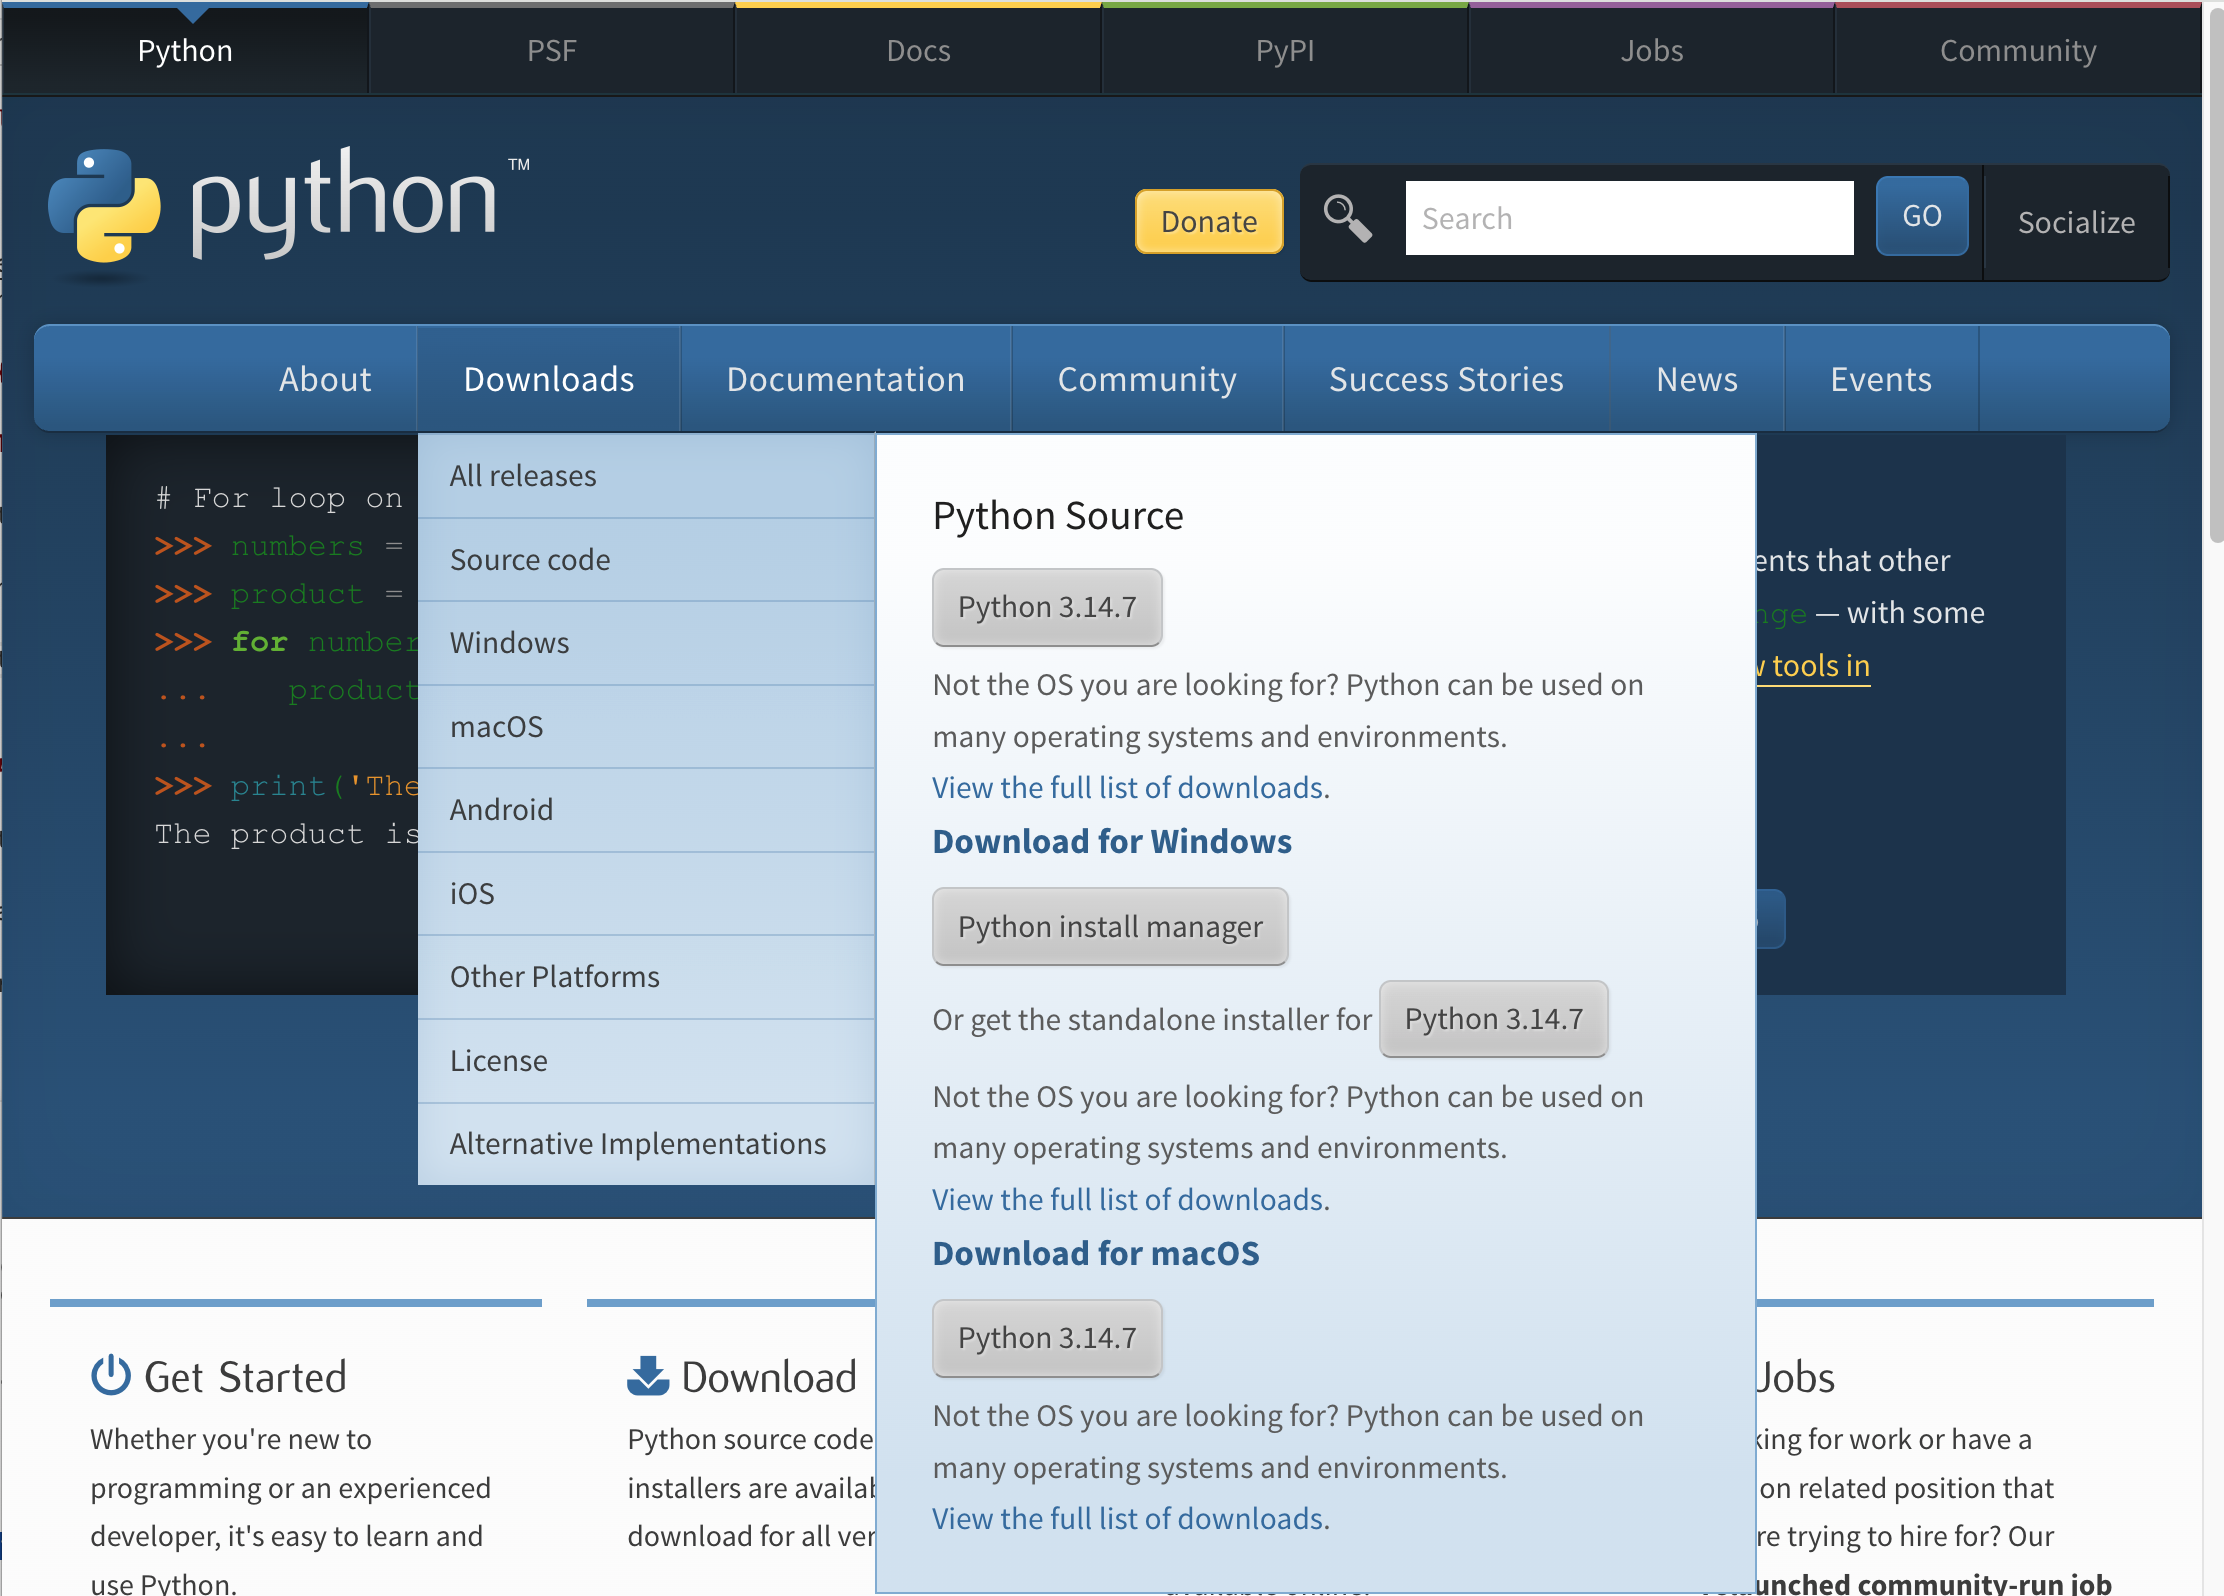
When you click on the appropriate installation, it will trigger the download of the installer. In Finder for Mac or File Explorer for Windows, navigate to your Downloads folder in the left sidebar. Click on the installer to start the installation process:
Mac

Once you click on the Installer, a window will pop up to guide you through the installation process. For the most part, just click Continue: 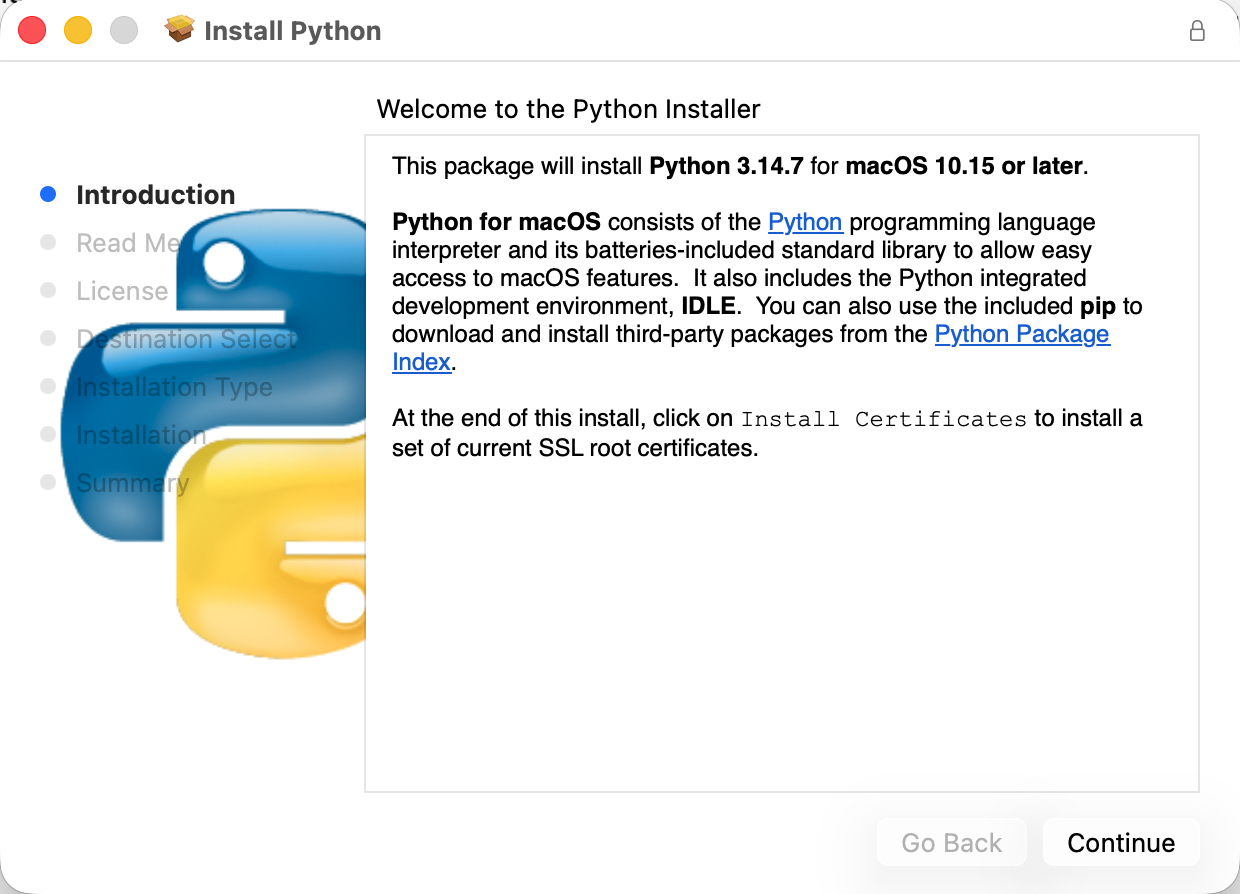
Eventually, you will be asked to Agree to their License: 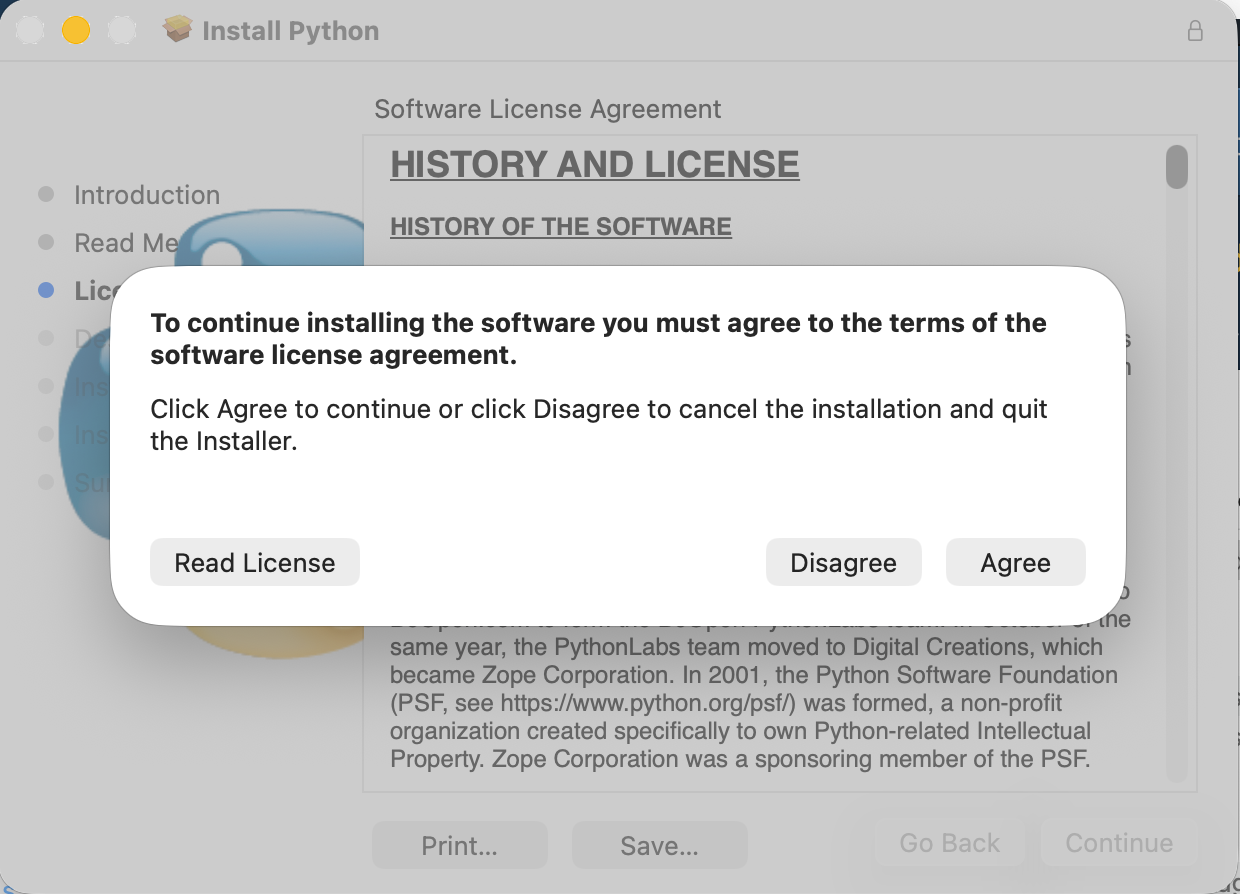
And then you will be prompted to start the installation: 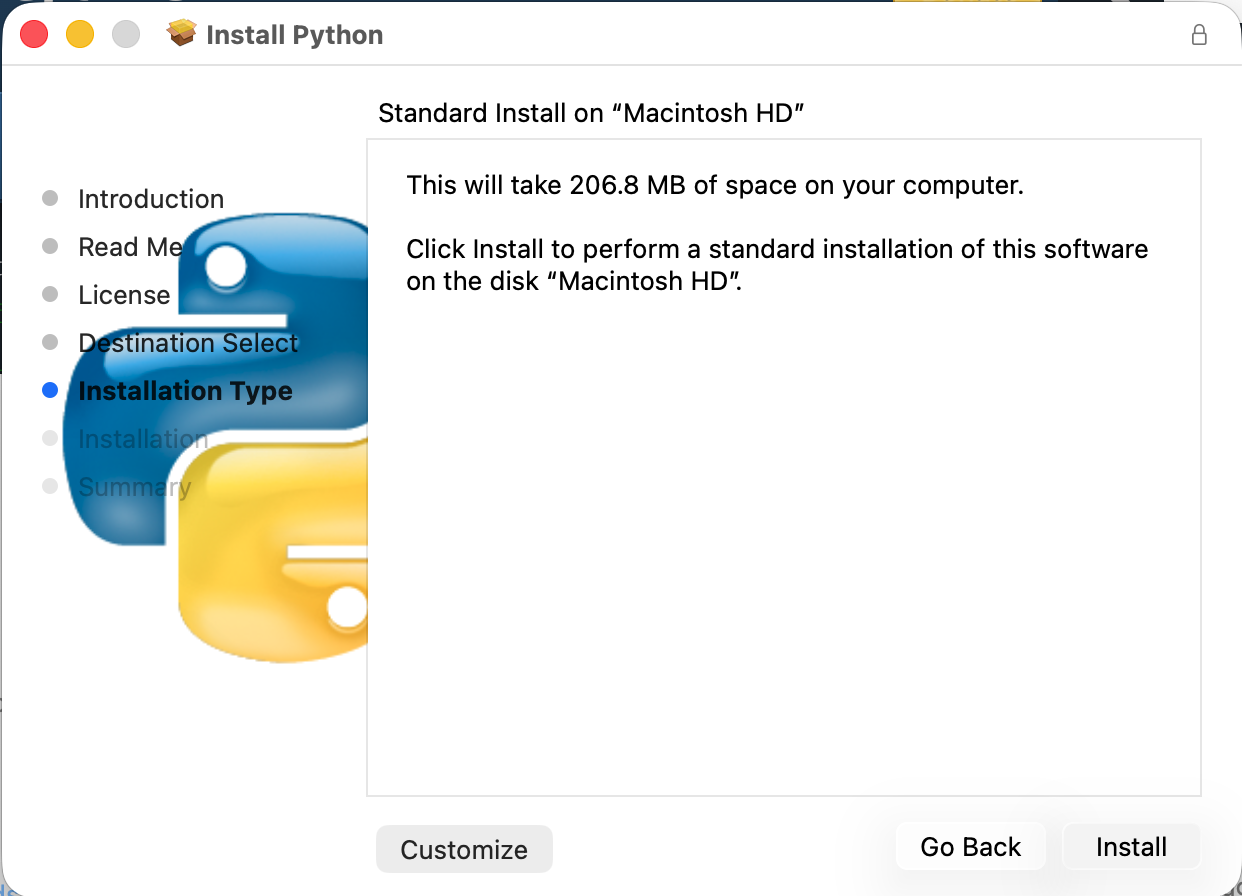
There will be a couple other windows after that, but the installation will practically be complete. You have Python now!
Windows
Once you’ve downloaded your distribution of Python, it should be in your Downloads folder. Click on the installer to launch it: 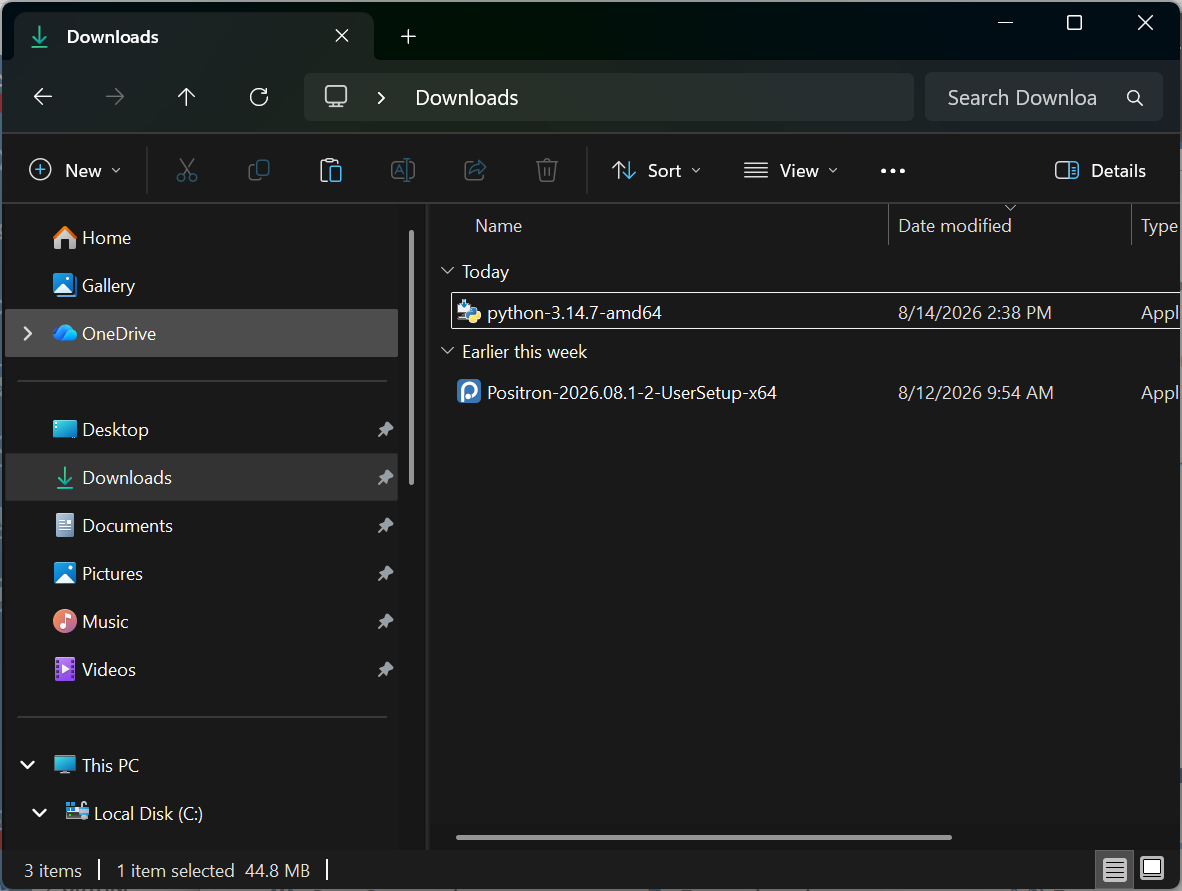
From there, you’ll see the page to launch the installer. NOTE: Make sure you check the option to add Python to the PATH - this is extremely important. If you don’t do it, it’s fixable, but it’s annoying. From there, click the button for standard installation, Install Now: 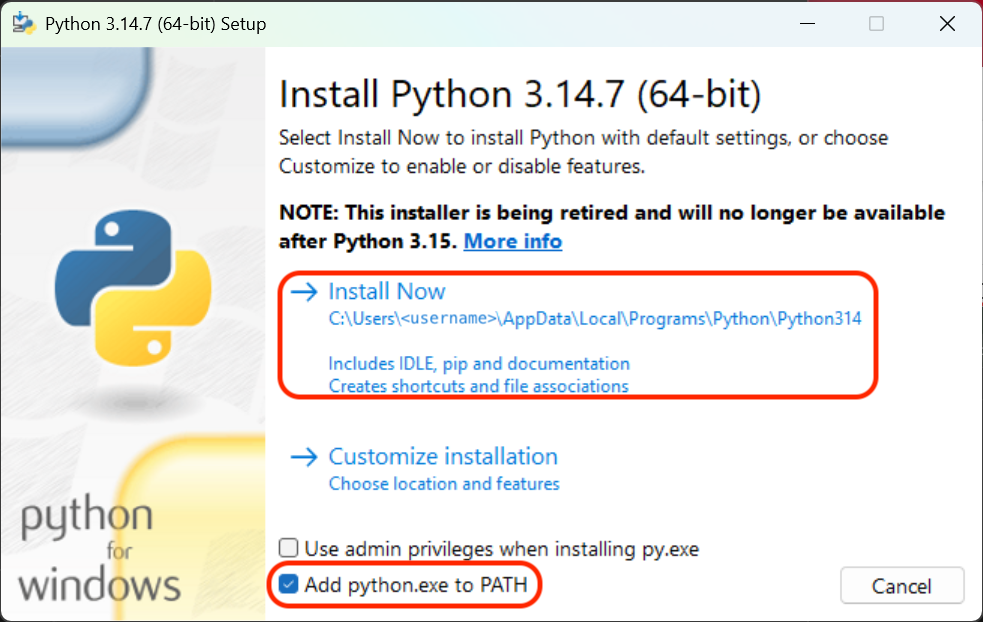
From there, the installation will commence. When it completes, you have Python set up and ready!
Download VSCode
Python is the language (like Spanish or Chinese). When we write in a language, we typically either have paper or we use an application like Word or something similar. We need the same kind of tool for writing Python! These can be called “text editors” or IDEs. An IDE is an “integrated development environment” and typically has some extra features that help with writing code. VSCode can function just as a text editor, but it also has additional functionality that can be nice!
First, we’ll navigate to https://code.visualstudio.com/ to download the application. When you get there, it should recommend the version you want. At the time of writing, it highlights AI integration – know that you do not have to use it (AI’s just a buzzword). Click the button in the center of the screen that says Download ...: 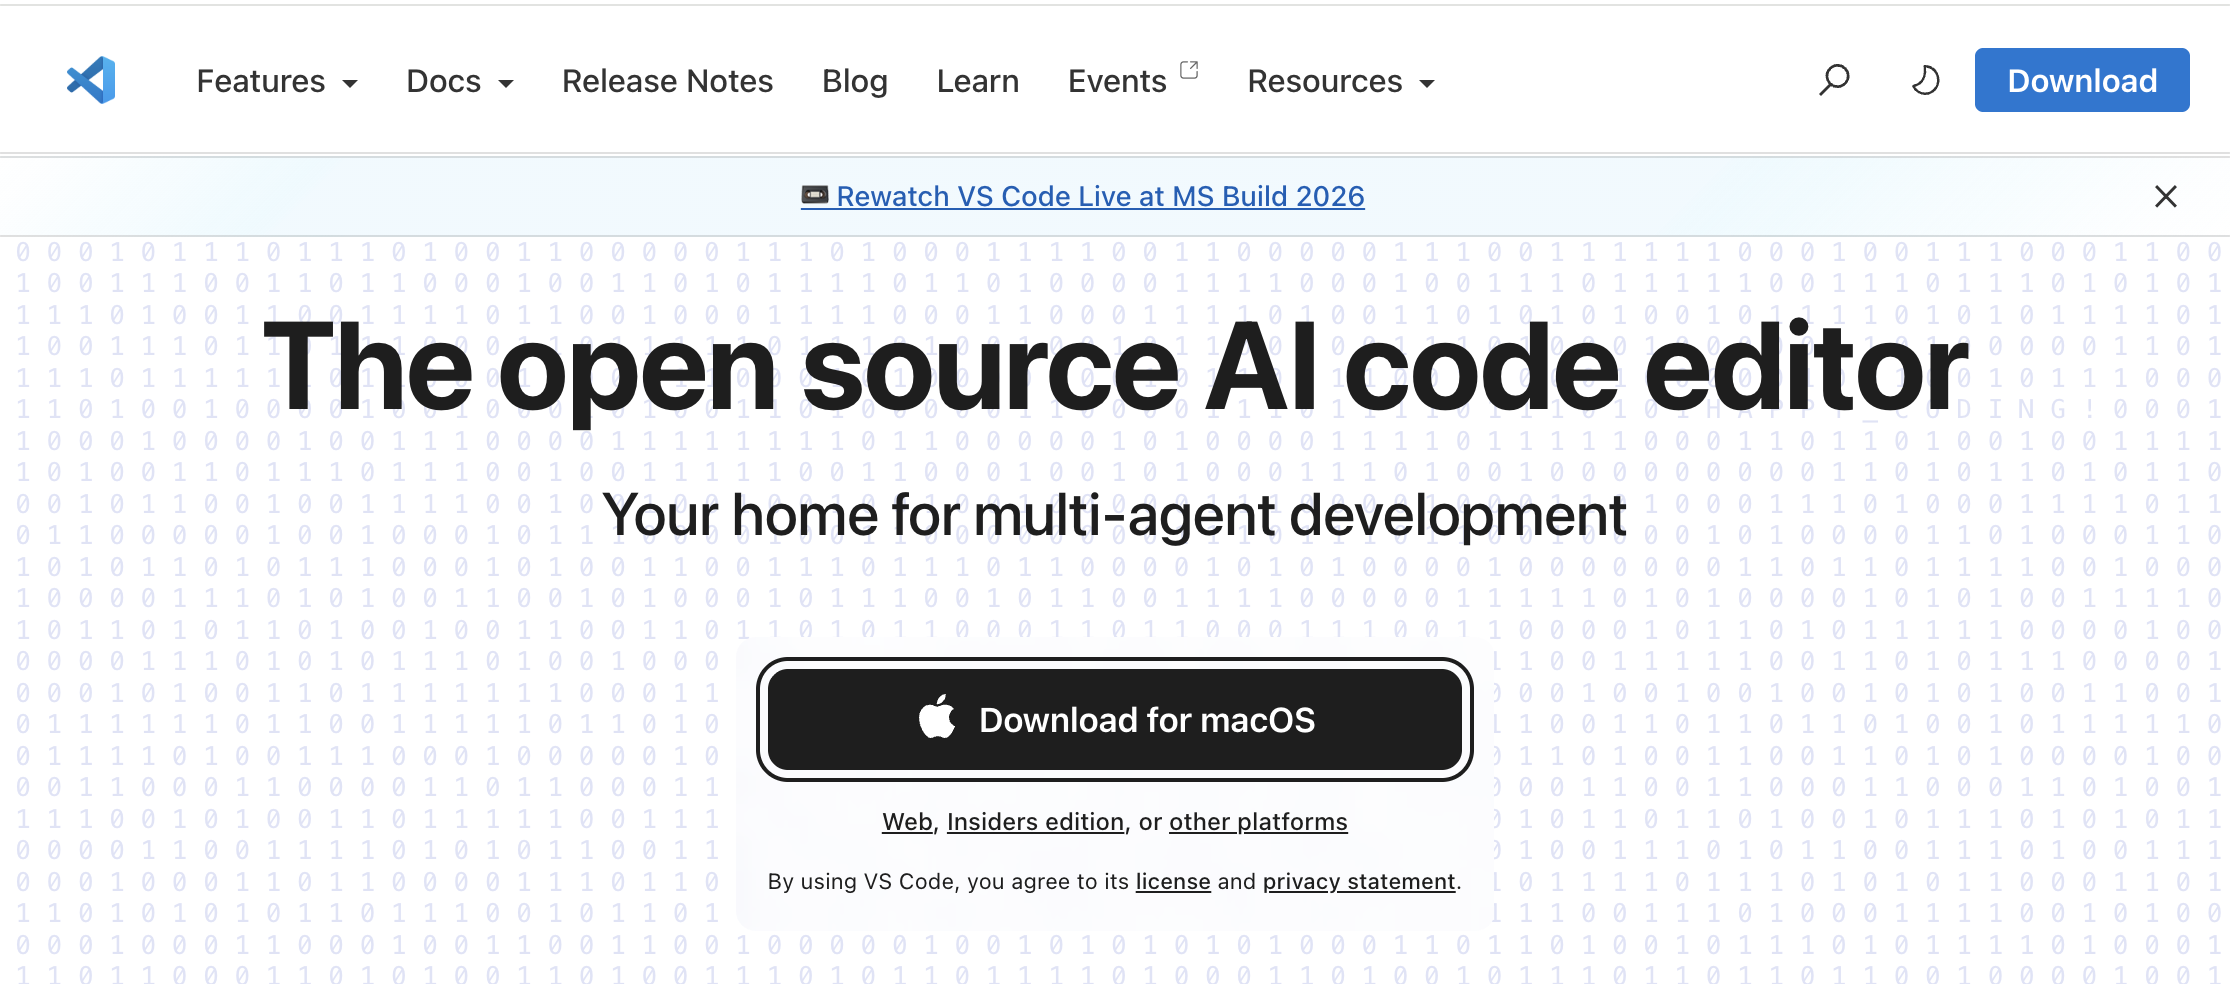
The VSCode installer, like the Python installer, will go into your Downloads folder: 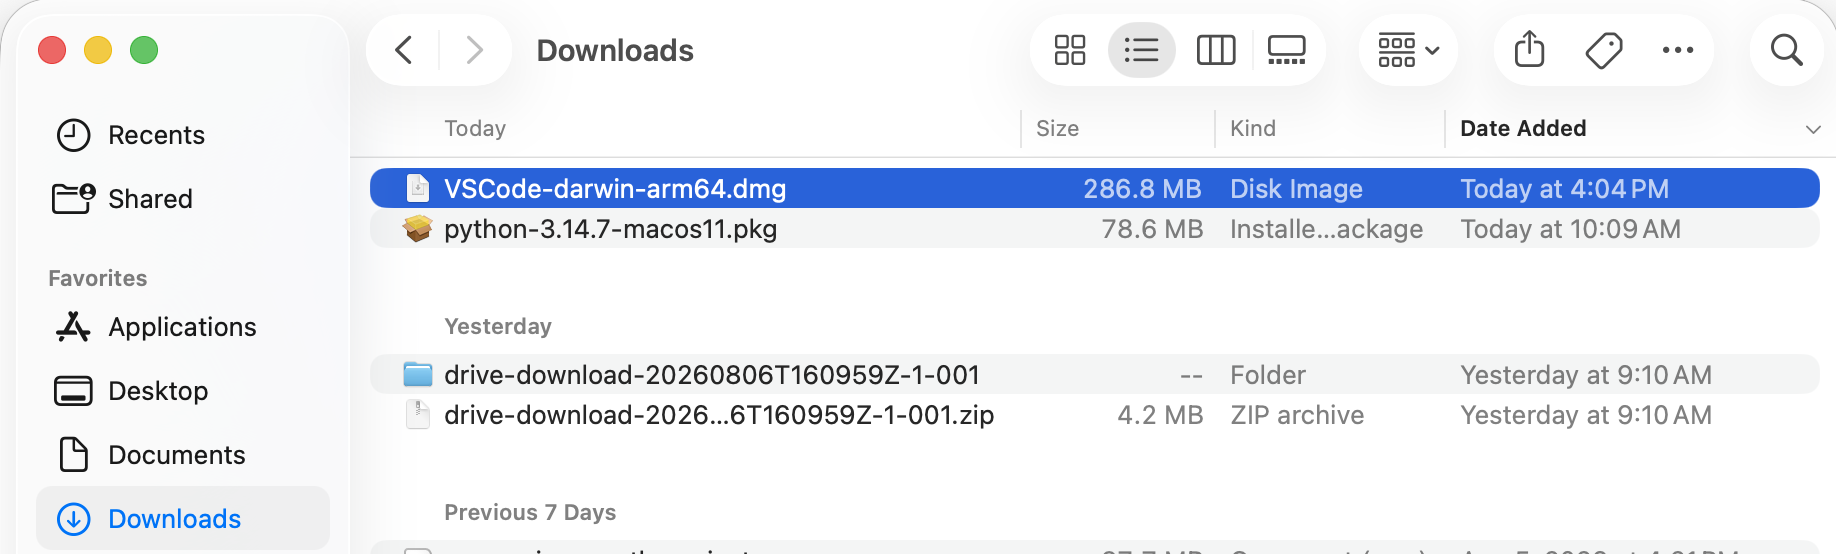
Mac
Unlike Python, there isn’t a long process to install it. You will simply click and drag VSCode (following the arrow shown) into your Applications folder: 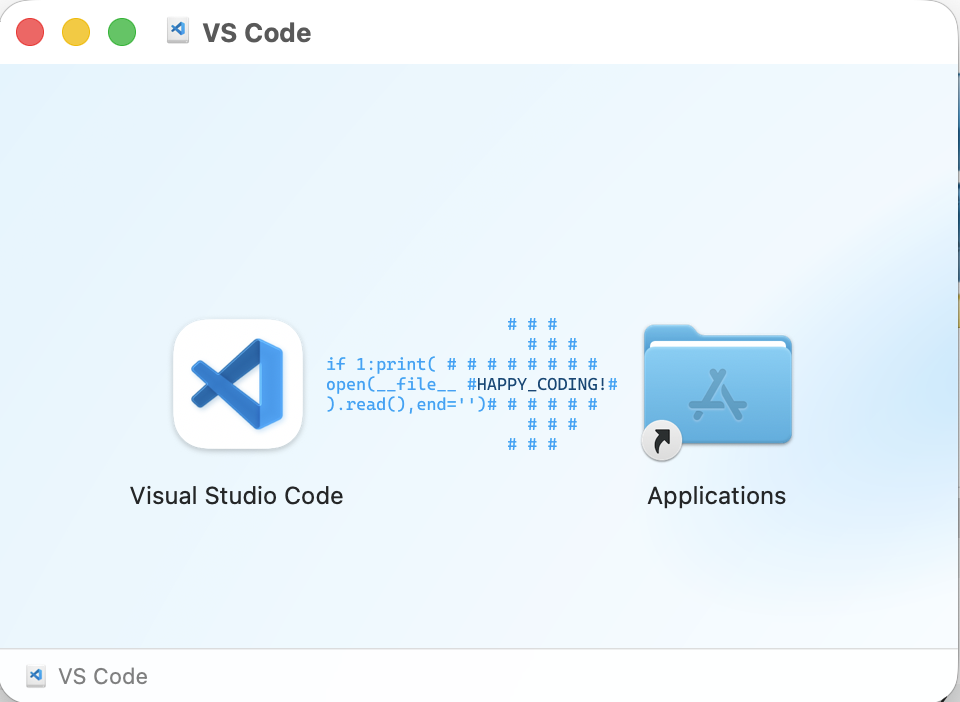
And, you’re ready!
Windows
First, you’ll be asked to agree to the license. Agree and click Next: 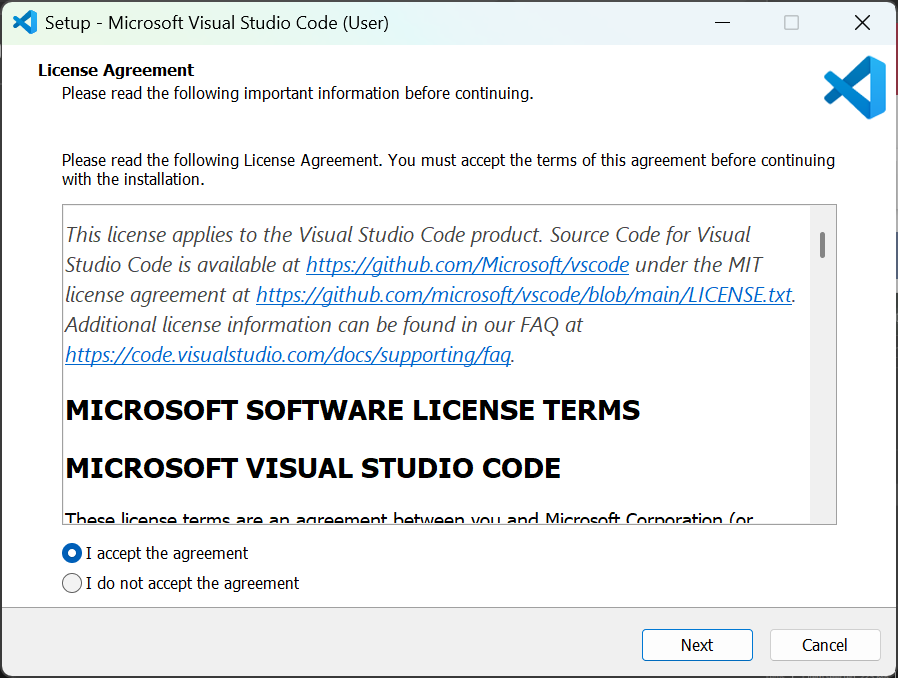
From there, you’ll be asked to choose the location of VSCode. Accept the default path by clicking Next: 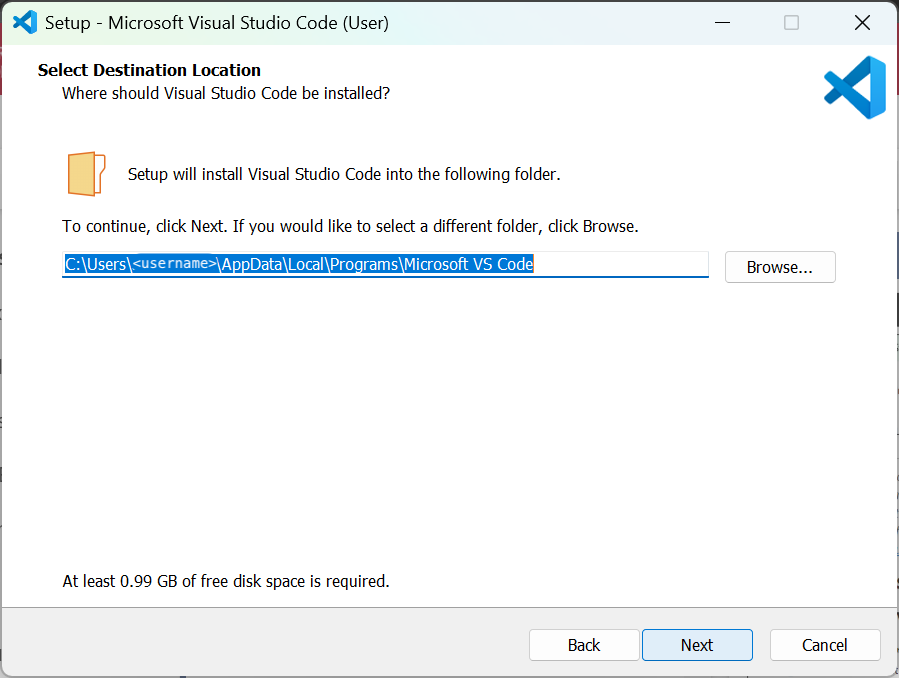
Click Next for the next two pages:
- Selecting a start menu folder
- Selecting additional tasks
And then finally click Install on the Ready to Install page: 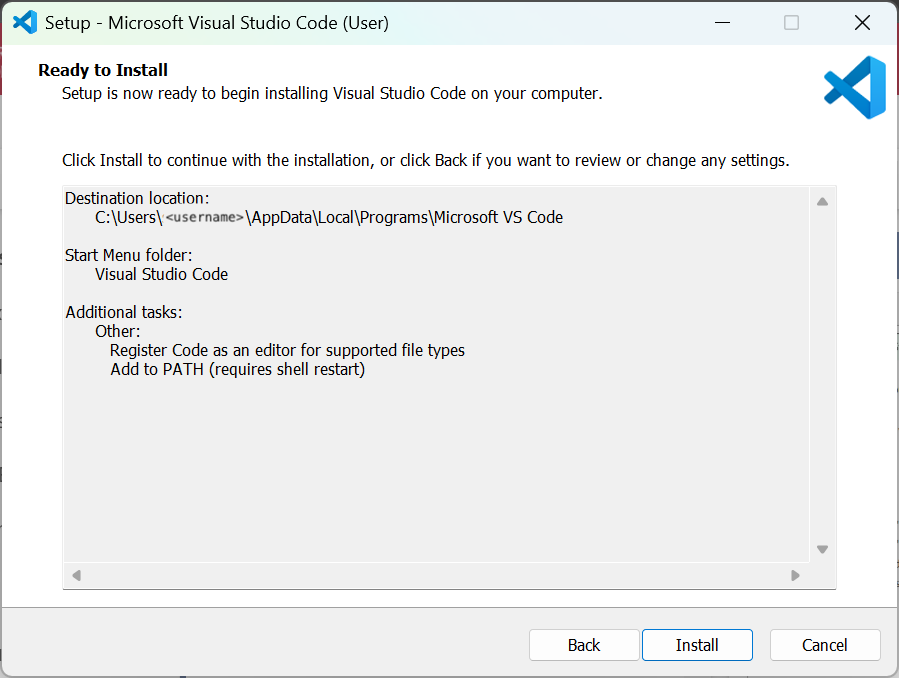
Once the app finishes installing, you’re ready to go!
Create a new folder for tutorials
Open up the VSCode application we just installed. When you do, you’ll see the Welcome page. Click on the option to Open... a folder or file:
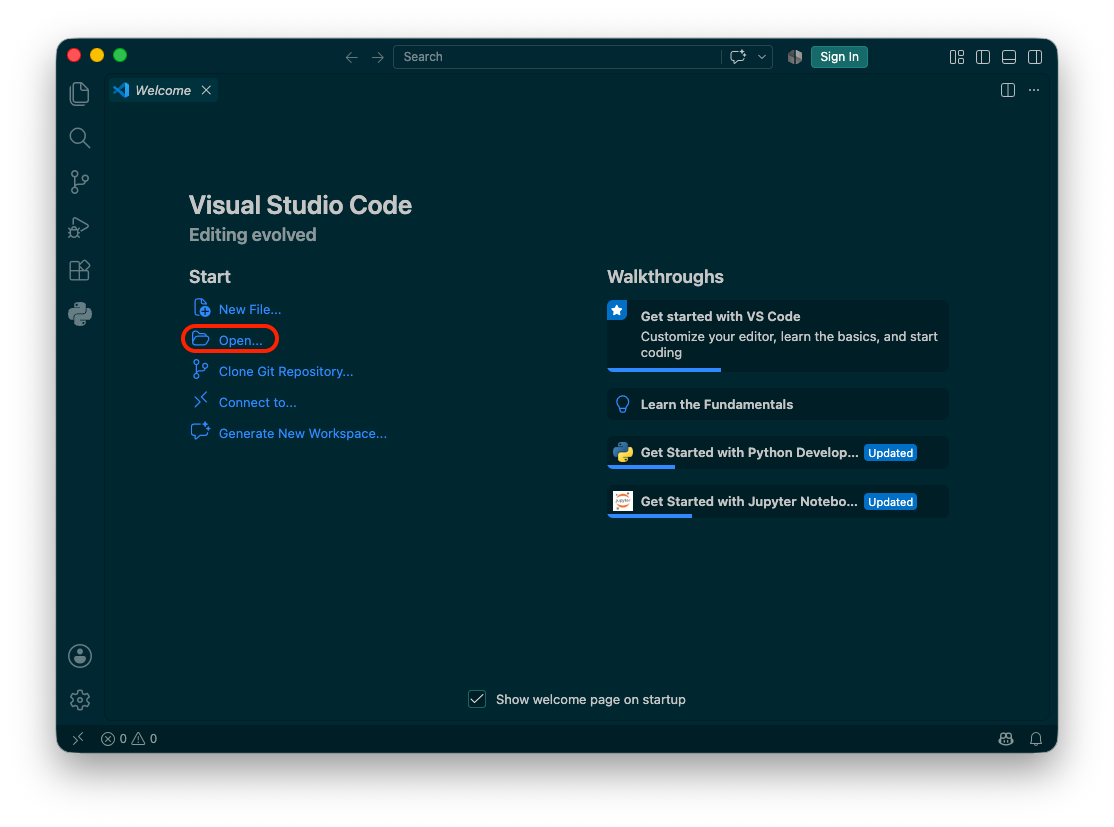
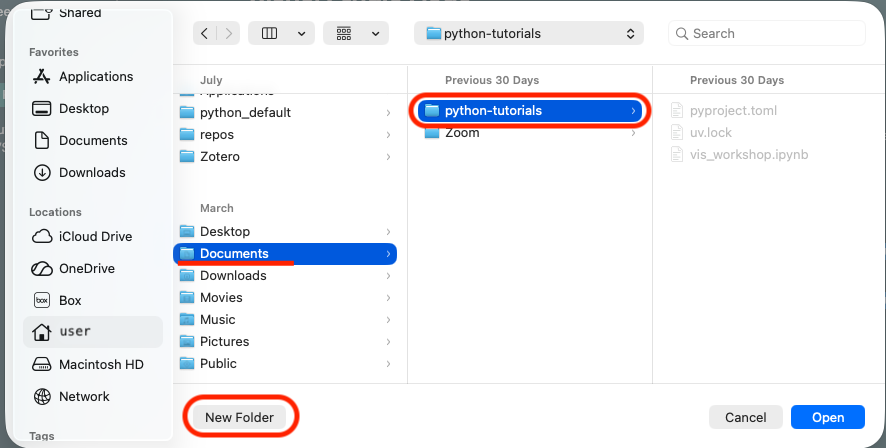
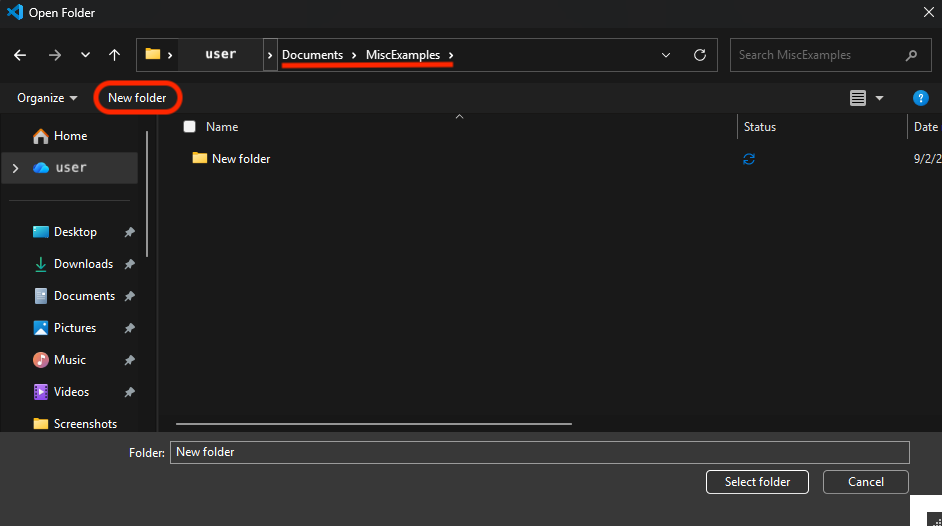
Open... highlightedWhen the file management system opens up, choose the folder you would like to Open. If you have created a folder already, open that one! Otherwise, create a New Folder in the place you want it to be saved:
Mac
Windows
Last but not least: installing packages
This is where, long-term, Python can be difficult, but you shouldn’t have problems with most (if not all) of the packages used in these tutorials.
Let’s start with a metaphor. Imagine you open your computer and get started with what you want to do during the day. Maybe you open your email app. Maybe you open the Zoom app. Maybe you open your internet browser. Each of those applications has a specific purpose, right? So, you open each of them when you need to complete a task that requires them.
We have something similar in Python and they’re called packages! Before we complete a task that requires specific features in Python, we often need to install a package (like our email app in the earlier metaphor) in order to use it.
This tutorial provides two options for Python “package managers”:
Using uv (recommended)
uv is a newer Python package manager (it makes sure all our “apps” work together) and it’s extremely fast. It’s also reliable for managing conflicting dependencies (apps/packages that don’t work together). I will recommend using uv instead of pip to make sure you’re starting off on the right foot when it comes to tidy Python development.
To install uv, we will run a command in a new Terminal window in VSCode using the Terminal tab in the top left corner of your screen or VSCode window. Once you have the Terminal open, run the following command or look at the documentation for alternatives here:
Mac
curl -LsSf https://astral.sh/uv/install.sh | shWindows
powershell -ExecutionPolicy ByPass -c "irm https://astral.sh/uv/install.ps1 | iex"Alternatively, you can install it using Python, but you’ll have to add python -m before the uv commands you run below.
If you’re on a Mac, you may have to use pip3 instead of pip.
pip install uvOnce you have uv installed, we’re going to initialize the uv project. uv treats folders as “Projects”, similar to some other programming languages. So, first we need to initialize the project:
uv initThen, we tell uv to make what we call a “virtual environment”. You can think of it kinda like a sandbox, where the sand is all the “apps”/packages that we want to play nicely in our environment. It does not affect the rest of your Python environment, so if something goes wrong (which does happen in Python), it’s easy to recreate. It also makes it easier to share what exact packages you used to run your Python code. You should create one of these for each of your projects. To create the virtual environment, type:
uv venvYou should see a message telling you the virtual environment was created and also see a new folder in your left sidebar called .venv. Python (and VSCode) recognize this as an environment folder.
Once the environment is created, we tell uv which packages we want to put in it. So, here’s an example command. It always starts with uv add followed by all of the packages you want to install, separated by spaces. Don’t worry - if you forget to add a package the first time you create the environment or need to add another one, you just run uv add again with the package you want to install.
uv add pandas plotnine seaborn matplotlib jupyterHere is what these commands look like in the VSCode Terminal:
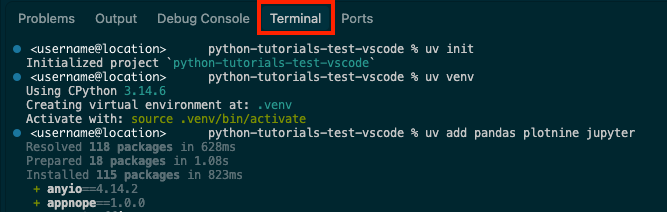
Finally, we run the command uv sync to make sure our environment and the project file created by uv (pyproject.toml) are synced together.
Using pip (the original)
The classic method for installing packages in Python involves using pip. Each of the tutorials will outline the packages that need to be installed, but I’ll provide a some that you will need and that I would recommend here.
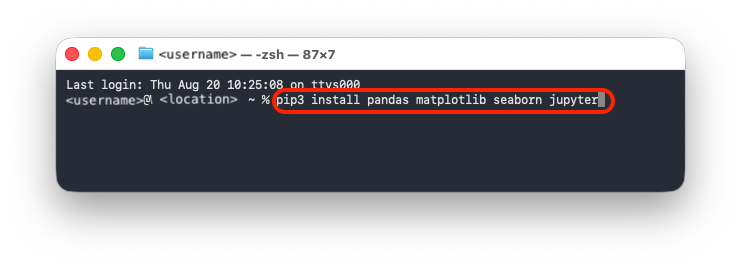
To install packages using pip, we’re actually going to open up a separate app that your computer has by default. On Mac, this will be your Terminal, and on Windows this will be PowerShell. You can search for your respective app using Spotlight Search on Mac (press
Once you have your Terminal or PowerShell open, we’ll run this command:
pip3 install pandas plotnine matplotlib seaborn jupyterMac
Windows

Once the packages are installed, you’re ready to create your first Jupyter Notebook (it’s an interactive document that allows us to both write code and take notes!).
Create a new Jupyter Notebook: it’s time to write some code!
In the left side bar, click on the New File... icon and then type in the name of the file you want to create. Whatever it is, it has to include the file extension (think .docx, or .xlsx) .ipynb for “iPython Notebook”:
You may also need to click on the Kernel (button in the top right) and accept the installation of the Python/jupyter VSCode extension.
To start writing code, the last step you’ll take is clicking on the +Code button at the top right of the new document to make a code block.
You’re ready to go!